微信SDK接入
微信SDK接入
扫码登录
扫事件码+手机号
先扫微信公众号带参数的二维码登录 ,然后绑定手机号
扫事件码+授权
先扫微信公众号带参数的二维码登录 ,然后在公众号里面点击授权
具体流程:
用户进入网站,请求登录二维码(升级Websocket)
后端生成带参数的二维码给前端
前端扫码关注公众号
- 用户已关注公众号:走 SUBSCRIBE事件。
- 用户未关注公众号:走SCAN事件
关注公众号后,后端会接收到微信回调传来的
openId和事件码如果没有注册,那么就给微信公众号界面发送一个 授权的链接。
缺点:需要公众号认证,300块钱,不过测试号有这个功能
公众号获取事件码+用户填写
网站只展示公众号的二维码,用户扫码后 ,会给用户推送一个动态码让用户填写,同时会记录这个事件的openId
用户填写后,就完成了用户openId和网站用户的绑定
网站展示事件码+公众号填写
网站展示二维码,用户扫码后,给公众号发条消息进行登录。
后端收到消息,里面会有用户的openId和事件码
微信SDK接入
导入依赖
<dependency>
    <groupId>com.github.binarywang</groupId>
    <artifactId>weixin-java-mp</artifactId>
    <version>4.6.0</version>
</dependency>
导入配置
application.properties
mallchat.wx.callback=http://xx.natappfree.cc
mallchat.wx.appId=xx
mallchat.wx.secret=xx
mallchat.wx.token=xxx
mallchat.wx.aesKey=sha1
WxMpProperties.java
@Data
@ConfigurationProperties(prefix = "wx.mp")
public class WxMpProperties {
    /**
     * 是否使用redis存储access token
     */
    private boolean useRedis;

    /**
     * redis 配置
     */
    private RedisConfig redisConfig;

    @Data
    public static class RedisConfig {
        /**
         * redis服务器 主机地址
         */
        private String host;

        /**
         * redis服务器 端口号
         */
        private Integer port;

        /**
         * redis服务器 密码
         */
        private String password;

        /**
         * redis 服务连接超时时间
         */
        private Integer timeout;
    }

    /**
     * 多个公众号配置信息
     */
    private List<MpConfig> configs;

    @Data
    public static class MpConfig {
        /**
         * 设置微信公众号的appid
         */
        private String appId;

        /**
         * 设置微信公众号的app secret
         */
        private String secret;

        /**
         * 设置微信公众号的token
         */
        private String token;

        /**
         * 设置微信公众号的EncodingAESKey
         */
        private String aesKey;
    }

    @Override
    public String toString() {
        return JSONUtil.toJsonStr(this);
    }
}
WxMpConfiguration.java
@AllArgsConstructor
@Configuration
@EnableConfigurationProperties(WxMpProperties.class)
public class WxMpConfiguration {
    private final LogHandler logHandler;
    private final MsgHandler msgHandler;
    private final SubscribeHandler subscribeHandler;
    private final ScanHandler scanHandler;
    private final WxMpProperties properties;

    @Bean
    public WxMpService wxMpService() {
        final List<WxMpProperties.MpConfig> configs = this.properties.getConfigs();
        if (configs == null) {
            throw new RuntimeException("配置文件中未找到相关配置信息,请检查配置文件是否正确!");
        }

        WxMpService service = new WxMpServiceImpl();
        service.setMultiConfigStorages(configs
                .stream().map(a -> {
                    WxMpDefaultConfigImpl configStorage;
                    configStorage = new WxMpDefaultConfigImpl();

                    configStorage.setAppId(a.getAppId());
                    configStorage.setSecret(a.getSecret());
                    configStorage.setToken(a.getToken());
                    configStorage.setAesKey(a.getAesKey());
                    return configStorage;
                }).collect(Collectors.toMap(WxMpDefaultConfigImpl::getAppId, a -> a, (o, n) -> o)));
        return service;
    }

    @Bean
    public WxMpMessageRouter messageRouter(WxMpService wxMpService) {
        final WxMpMessageRouter newRouter = new WxMpMessageRouter(wxMpService);

        // 记录所有事件的日志 (异步执行)
        newRouter.rule().handler(this.logHandler).next();

        // 关注事件
        newRouter.rule().async(false).msgType(EVENT).event(SUBSCRIBE).handler(this.subscribeHandler).end();

        // 扫码事件
        newRouter.rule().async(false).msgType(EVENT).event(EventType.SCAN).handler(this.scanHandler).end();

        // 默认
        newRouter.rule().async(false).handler(this.msgHandler).end();

        return newRouter;
    }

}
设计模式之策略模式说明:针对不同的消息类型和事件类型,选择不同的处理器来处理消息。每个处理器如logHandler、subscribeHandler、scanHandler、msgHandler分别实现了不同的消息处理策略。
设计模式之责任链模式说明:WxMpMessageRouter内部维护了一条消息处理的责任链。每个规则节点根据消息内容决定是否处理并传递给下一个节点。next()方法表示继续传递,end()方法表示终止传递。
微信api交互接口:WxPortalController.java
@Slf4j
@AllArgsConstructor
@RestController
@RequestMapping("wx/portal/public")
public class WxPortalController {

    private final WxMpService wxService;
    private final WxMpMessageRouter messageRouter;
    private final WxMpService wxMpService;

    private final WxMsgService wxMsgService;

    @GetMapping("/test")
    public String test() {
        WxMpQrCodeTicket ticket = null;
        try {
            ticket = wxMpService.getQrcodeService().qrCodeCreateTmpTicket(1, 1000);
        } catch (WxErrorException e) {
            throw new RuntimeException(e);
        }
        log.info("url={}", ticket.getUrl());
        return ticket.getUrl();
    }

    @GetMapping(produces = "text/plain;charset=utf-8")
    public String authGet(@RequestParam(name = "signature", required = false) String signature,
                          @RequestParam(name = "timestamp", required = false) String timestamp,
                          @RequestParam(name = "nonce", required = false) String nonce,
                          @RequestParam(name = "echostr", required = false) String echostr) {

        log.info("\n接收到来自微信服务器的认证消息:[{}, {}, {}, {}]", signature,
                timestamp, nonce, echostr);
        if (StringUtils.isAnyBlank(signature, timestamp, nonce, echostr)) {
            throw new IllegalArgumentException("请求参数非法,请核实!");
        }
        if (wxService.checkSignature(timestamp, nonce, signature)) {
            return echostr;
        }

        return "非法请求";
    }

    @GetMapping("/callBack")
    public RedirectView callBack(@RequestParam String code) throws WxErrorException {
        // 授权之后的回调
        log.info("code={}", code);
        WxOAuth2AccessToken accessToken = wxMpService.getOAuth2Service().getAccessToken(code);
        WxOAuth2UserInfo userInfo = wxMpService.getOAuth2Service().getUserInfo(accessToken, "zh_CN");
        wxMsgService.authCallBack(userInfo);
        log.info("userInfo={}", userInfo);
        RedirectView redirectView = new RedirectView();
        redirectView.setUrl("http://www.baidu.com");
        return redirectView;
    }

    @PostMapping(produces = "application/xml; charset=UTF-8")
    public String post(@RequestBody String requestBody,
                       @RequestParam("signature") String signature,
                       @RequestParam("timestamp") String timestamp,
                       @RequestParam("nonce") String nonce,
                       @RequestParam("openid") String openid,
                       @RequestParam(name = "encrypt_type", required = false) String encType,
                       @RequestParam(name = "msg_signature", required = false) String msgSignature) {
        log.info("\n接收微信请求:[openid=[{}], [signature=[{}], encType=[{}], msgSignature=[{}],"
                        + " timestamp=[{}], nonce=[{}], requestBody=[\n{}\n] ",
                openid, signature, encType, msgSignature, timestamp, nonce, requestBody);

        if (!wxService.checkSignature(timestamp, nonce, signature)) {
            throw new IllegalArgumentException("非法请求,可能属于伪造的请求!");
        }

        String out = null;
        if (encType == null) {
            // 明文传输的消息
            WxMpXmlMessage inMessage = WxMpXmlMessage.fromXml(requestBody);
            WxMpXmlOutMessage outMessage = this.route(inMessage);
            if (outMessage == null) {
                return "";
            }

            out = outMessage.toXml();
        } else if ("aes".equalsIgnoreCase(encType)) {
            // aes加密的消息
            WxMpXmlMessage inMessage = WxMpXmlMessage.fromEncryptedXml(requestBody, wxService.getWxMpConfigStorage(),
                    timestamp, nonce, msgSignature);
            log.debug("\n消息解密后内容为:\n{} ", inMessage.toString());
            WxMpXmlOutMessage outMessage = this.route(inMessage);
            if (outMessage == null) {
                return "";
            }

            out = outMessage.toEncryptedXml(wxService.getWxMpConfigStorage());
        }

        log.debug("\n组装回复信息:{}", out);
        return out;
    }

    private WxMpXmlOutMessage route(WxMpXmlMessage message) {
        try {
            return this.messageRouter.route(message);
        } catch (Exception e) {
            log.error("路由消息时出现异常!", e);
        }

        return null;
    }
}
微信测试号配置
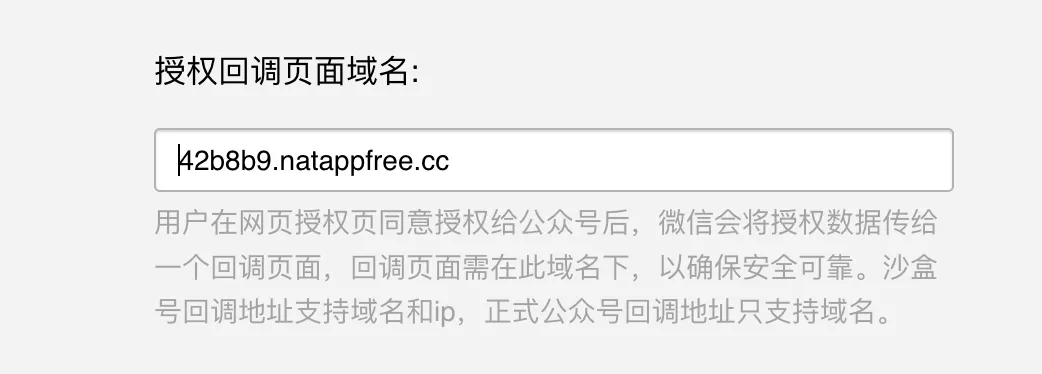
之前写博客的时候写了点,把后端启动,对应的接口写好,然后开内网穿透,ngrok有问题用不了,可以使用natapp或者花生壳 链接
主要填写 以下信息:
自己本机的后端 地址,要是内网穿透后的

回调页面域名,不需要加https

和内网穿透的域名保持一致即可

带参数二维码生成
用户初次进入网站,会先请求获取一个带参数的二维码:
{
    "type":1
}
后端去生成这样一个带参数的二维码给前端:
@SneakyThrows
@Override
public void handleLoginRequest(Channel channel) {
    // 1.生成一个随机码
    Integer code = generateLoginCode(channel);

    // 2.找微信申请带参数的二维码
    WxMpQrCodeTicket ticket = wxMpService.getQrcodeService().qrCodeCreateTmpTicket(code, (int) DURATION.getSeconds());

    // 3.把码推送给前端
    sendMsg(channel, WSAdapter.buildLoginResp(ticket));
}
这时候,有了链接,测试的时候可以使用草料二维码生成,然后 扫码进行后续操作
用户授权
我们希望用户扫码之后,可以获取到微信头像,名称等信息,这就需要进行用户授权,当扫码之后调用的事件:
public WxMpXmlOutMessage handle(WxMpXmlMessage wxMpXmlMessage, Map<String, Object> map,
                                WxMpService wxMpService, WxSessionManager wxSessionManager) throws WxErrorException {
    return wxMsgService.scan(wxMpXmlMessage);
}
具体逻辑:
private static final String URL = "https://open.weixin.qq.com/connect/oauth2/authorize?appid=%s&redirect_uri=%s&response_type=code&scope=snsapi_userinfo&state=STATE#wechat_redirect";

/**
 * openid和登录code的映射map
 */
private static final ConcurrentHashMap<String, Integer> WAIT_AUTHORIZE_MAP = new ConcurrentHashMap<>();

@Override
public WxMpXmlOutMessage scan(WxMpXmlMessage wxMpXmlMessage) {
    String openId = wxMpXmlMessage.getFromUser();
    Integer code = getEventKey(wxMpXmlMessage);
    if (Objects.isNull(code)) {
        log.error("code is null");
        return null;
    }
    User user = userService.getByOpenId(openId);
    boolean registered = Objects.nonNull(user);
    boolean authorized = registered && StrUtil.isNotBlank(user.getAvatar());
    // 用户已经注册并且授权
    if (registered && authorized) {
        // 走成功逻辑,通过code找到给channel推送消息
        webSocketService.scanLoginSuccess(code, user.getId());
    }
    // 没有登陆成功
    if (!registered) {
        // 走注册逻辑
        User registerUser = UserAdapter.buildUserSave(openId);
        userService.register(registerUser);
    }
    // 推送授权链接
    WAIT_AUTHORIZE_MAP.put(openId, code);
    webSocketService.waitAuthorize(code);
    String authorizeUrl = String.format(URL, wxMpService.getWxMpConfigStorage().getAppId(), URLEncoder.encode(callback + "/wx/portal/public/callBack"));
    log.info("authorizeUrl:{}", authorizeUrl);

    // 让用户授权
    return TextBuilder.build("请点击链接授权:<a href=\"" + authorizeUrl + "\">登录</a>", wxMpXmlMessage);
}
结果:

当用户点击了这个链接 ,会调用我们的回调地址:
@GetMapping("/callBack")
public RedirectView callBack(@RequestParam String code) throws WxErrorException {
    // 授权之后的回调
    log.info("code={}", code);
    WxOAuth2AccessToken accessToken = wxMpService.getOAuth2Service().getAccessToken(code);
    WxOAuth2UserInfo userInfo = wxMpService.getOAuth2Service().getUserInfo(accessToken, "zh_CN");
    wxMsgService.authCallBack(userInfo);
    log.info("userInfo={}", userInfo);
    RedirectView redirectView = new RedirectView();
    redirectView.setUrl("http://www.baidu.com");
    return redirectView;
}
这个时候就可以去保存用户的信息了
